Checking suspension joints and pivots
The Video Course teaches you everything about modern cars.
Almost all joints and pivots in a modern suspension system have rubber or plastic bushes, with the possible exception of steering swivel joints .
Because of the constant movement of the suspension parts, the bushes gradually wear out, soften and perish.
Oil contamination also causes them to deteriorate, and if they are allowed to deteriorate too much, they become loose and the steering and roadholding suffers.
It is essential to make a regular check on the condition of all joints in the suspension system .
If you find any joints or pivots to be worn or damaged, replace them (See How to replace anti-roll-bar bushes ) or have them replaced at a garage as soon as possible.
If any are found to be contaminated with oil, find the source of the leak and repair it, otherwise any new bushes fitted will be affected.
Examination of suspension parts can often be carried out with the wheels still on, but on some cars you may have to remove them. Wheels must be on for some checks.
Support the car securely on axle stands under chassis members. The force used to lever various suspension parts can easily topple a car that is not securely supported.
If you have only two axle stands, raise one end of the car at a time.
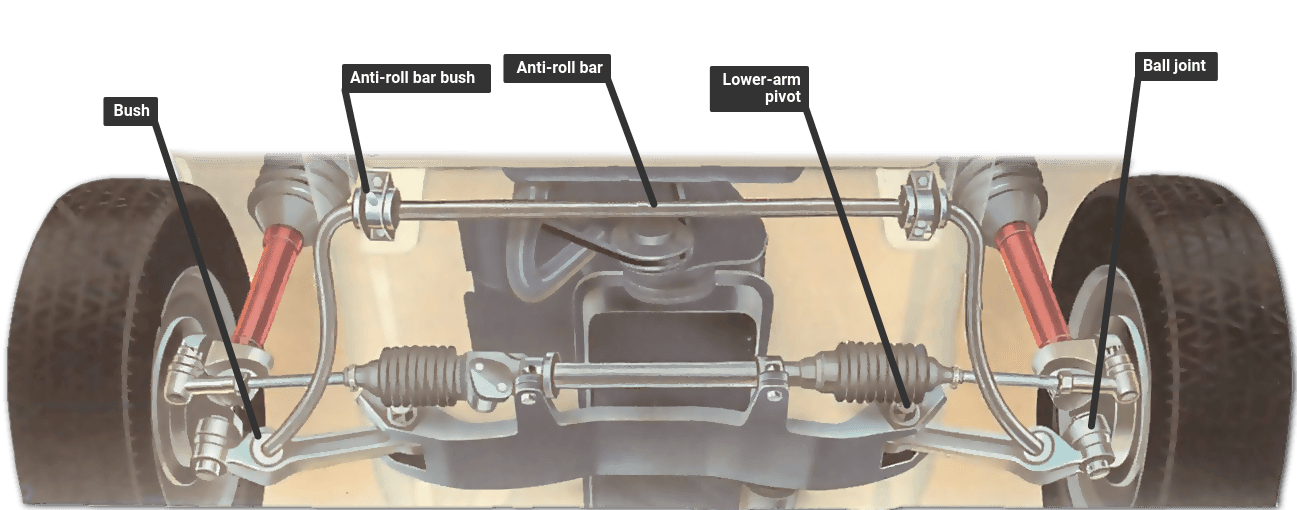
Check the wishbone joints where they pivot at the inner ends, and also the moving joints and pivots at the outer ends of the wishbone and track-control arms where they are fixed to the steering swivel members, or suspension legs in the case of MacPherson struts (See How car suspension works ).
Wipe road dirt and grease from all the joints and pivots, and clean around the mounting brackets. Check for corrosion at each point (See Cleaning the outside and checking for rust ).
If the rubber bushes are distorted, perished, cracked or contaminated by oil, they must be replaced. Some you can replace yourself, others should be replaced at a garage.
Check around the mountings for signs of rust or damage, probe load-bearing areas with a screwdriver and tap them with a small hammer to make sure they are sound.
Any rusted metal should be treated with a proprietary anti-rust fluid and repainted (See Eliminating rust before painting ). If it is badly corroded, it must be replaced at a garage, which may be able to weld in reinforcing plates . Otherwise, the suspension mounting may break loose.
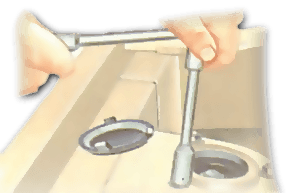
Ask a helper to put a stout lever under each front wheel in turn and lever upwards, while you watch both the inner and outer joints of the wishbone or track-control arms.
Look for any movement other than the normal pivoting motion.
If you see any movement inwards and outwards, examine the joints and bushes closely — they should not move. Use a lamp in dark, underwing areas.
With MacPherson struts, look at the mounting at the top of the inner wing panel. Check for corrosion, which is a common problem with older cars.
Open the bonnet and bounce the front of the car up and down while watching the rubber bush at the centre of the strut mounting. The bush should barely move.
If any flexing is seen, the bush should be replaced. Even if there is no flexing, check also the condition of the bush itself. Look for perishing and cracking, and replace the bush if it is not perfect.
On front-wheel-drive cars, check the condition of the constant-velocity joints on each drive shaft (See How to check U-Joints ).
The joints are usually protected by rubber gaiters. Wipe each gaiter clean and inspect it. If you find splits, have the gaiter replaced at a garage.
A damaged gaiter allows the oil or grease to escape and dirt to enter the joint; this causes excessive wear, and replacing the joints is expensive.
Checking the front suspension
Examine all the swivels on the suspension and steering links.
Jack the front of the car up, allowing the suspension to hang, and support it on axle stands. With weight off the suspension, inspect the rubber bushes for cracks, softness or distortion.
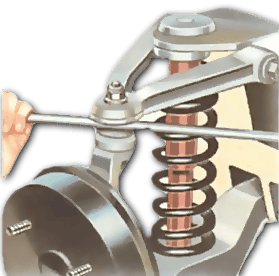
Check all the mountings and rubber bushes at the ends of the dampers and the anti-roll and stabiliser bars. Check all ball joints by levering with a bar.

Then check the suspension in its normal loaded position by jacking up each suspension arm in turn. Use a strong lever to try to move jointed components apart - any movement means that the joint must be replaced at a garage.
Get a helper to force the suspension upwards, using a long lever placed under the wheel, and look for play or distortion in all the joints and bushes.
Open the bonnet and check the top mountings on MacPherson-strut assemblies. Check the top pin bolts and rubber bushes: also the whole mounting plate and surrounding area for rust.
On some cars a reinforcing plate can be welded to the upper mount of the MacPherson strut, if rust has not weakened the rest of the structure. This work must be done by a garage.
Check the swivel pins on the steering swivel members with care: they take a lot of road shocks and are exposed to water and dirt. Pull against the top and bottom pins with a stout lever wedged against a solid chassis member.
Grip and twist the track control and stabiliser arms, to see if there is movement in the ball joints. Examine the rubber-bushed ends and joint dust covers. If there is loose movement, or if covers are split, renew the joints (See Replacing track-rod-end ball joints ).
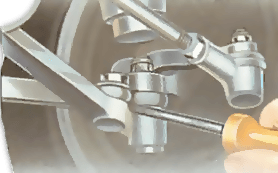
In joints that are held by large pins or bolts, lever sideways while checking for movement. Check the condition of the rubber bush and the state of the bolt. If they are worn, have them replaced.
Finally, test the anti-roll bar mountings for tightness.
Checking double wishbones
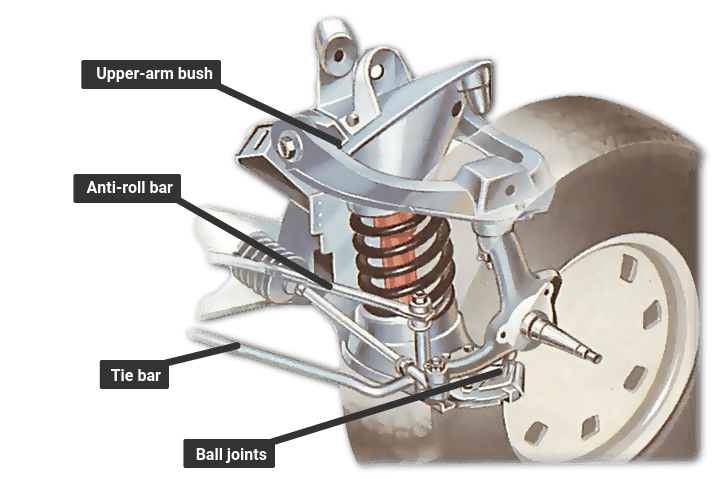
The wishbones support the steering swivel member at their outer ends, and the lower wishbone provides a mounting point for the coil spring and damper.
Examine the steering swivel pins for wear (See Checking steering swivel pins ). Check the condition of the bolts and bushes that hold the inner ends of the wishbones to the car chassis. Renew any worn parts.
Checking the rear suspension
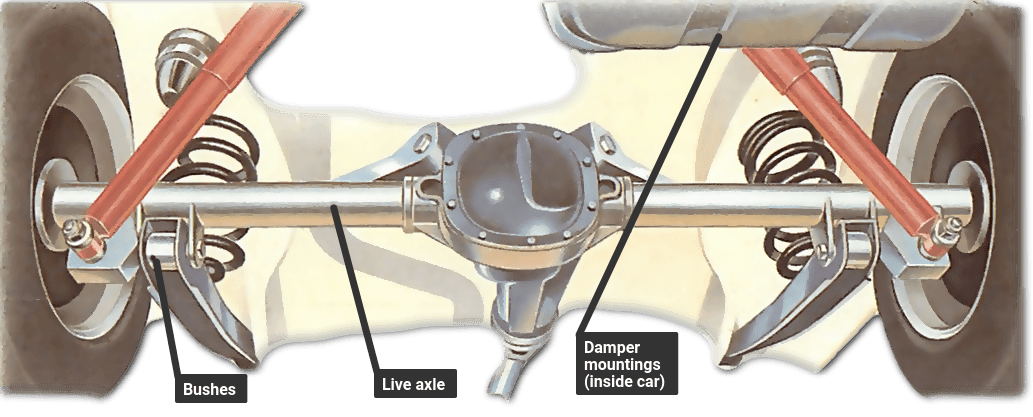
The rear suspension is simpler than the front, and most of the bushed joints are easy to inspect.
Jack up the rear of the car and support it on stands with the front wheels chocked.
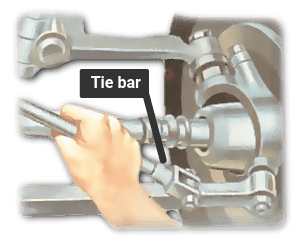
Lever against the various components while looking carefully' to see if there is any movement in the joint or bush.
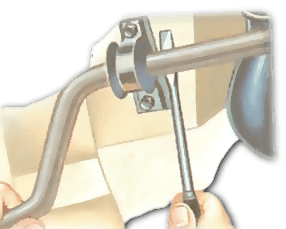
Check the joints at the end of the radius arm, or any other rod which locates the axle.
Wipe each joint clean, and check if it is perished, cracked or contaminated by oil.
If you suspect that a bush is damaged, check further by levering hard against it - make sure the other end of the lever is resting against a strong part of the suspension or floor pan .
Take care not to crush brake pipes or cables.
It helps to have an assistant lever against the joint while you watch it for movement.
Make sure, too, the pivot bolts are tight, and that the mounting brackets and the areas around the brackets are not corroded. Probe them with a screwdriver and tap them lightly with a hammer to see if they are sound.
If any weak metal is found, take the car to a garage and have the rusty areas repaired - assuming the value of the car makes that worth the cost.
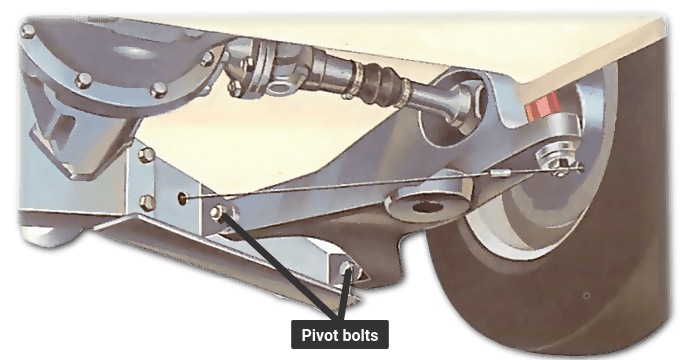
Usually, removing the rear suspension locating arms is straight-forward - unscrew the pivot bolts and lift out the arm.
Take it to a garage to have the old bushes removed and new ones fitted, if they are available. If they are not, the complete arm assembly must be replaced.
Checking torsion bars
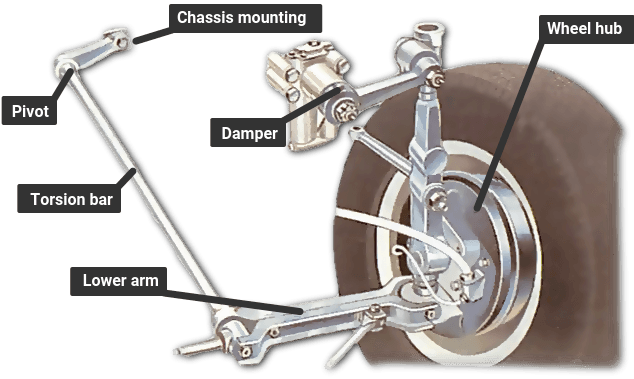
Many cars have torsion bars in the suspension instead of coil or leaf spring at the front, the rear or at both ends.
The inner mounting is on the floor pan and is usually well covered against deterioration, but can fail because of corrosion fatigue in due course. Check the soundness of the metal at the anchorage point.
The outer end, where it is fixed to the suspension member, can be attacked by mud, stones and road debris. Check its bushes along with all the others.
Checking rear trailing arms
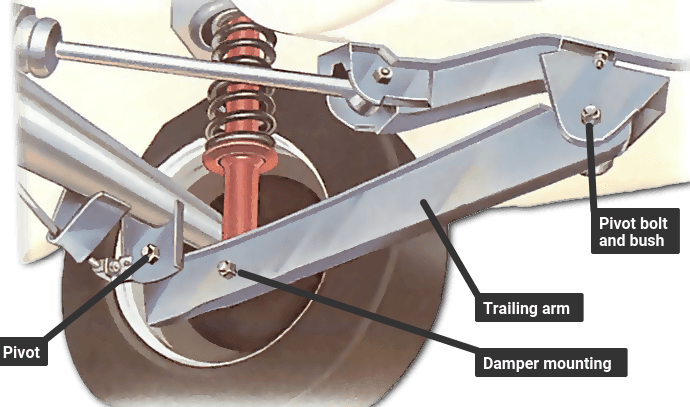
Examine every link and joint, including the damper mountings, for worn, distorted and oil-contaminated bushes.
Check the axle locating arm by trying to twist it in its bushes. There should be little or no movement.
Do not be afraid to lever hard against the mountings - road shocks can be severe, and the bushes need to be perfect.
If there are any worn or damaged components, have them replaced by a garage.
Checking an independent rear suspension
Jack the wheel off the ground and support that corner of the car with an axle stand placed under a chassis member. Remove the wheel if necessary, and examine all the rubber bushes as they are distorted by the weight of the suspension.
Replace any that are cracked or are badly distorted.

The Ultimate Car Mechanics video course
Learn everything about modern cars from our new video series.
Learn more >-
We build a Mazda MX5 Miata from scratch
We start by tearing down and then rebuilding the whole car.
-
Every part explained
There's ridiculous detail on every part. Clearly and easily explained.
-
All modeled in 3D
We've created the most detailed 3D model ever produced so we can show you everything working.
Super detailed explanations in the video course
15 hours of pro-quality, HD content with subtitles
The
video
course
Bonus: Dismantling the engine

Engine Block

Crankshaft

Tools: Using a tap set

Using an engine stand

The Pistons
