in Fuel systems
If the fuel gauge reads empty when you know there is fuel in the tank, the cause may be a faulty sender unit the electrical device that measures the level.
Or it may be a faulty gauge or a break in the wiring between the gauge and sender.
It is also possible for the fuel tank to read 'full' constantly, although the car has travelled some distance and has obviously used an amount of petrol.
The cause may be a fault in the insulation of the wiring, resulting in a short circuit .
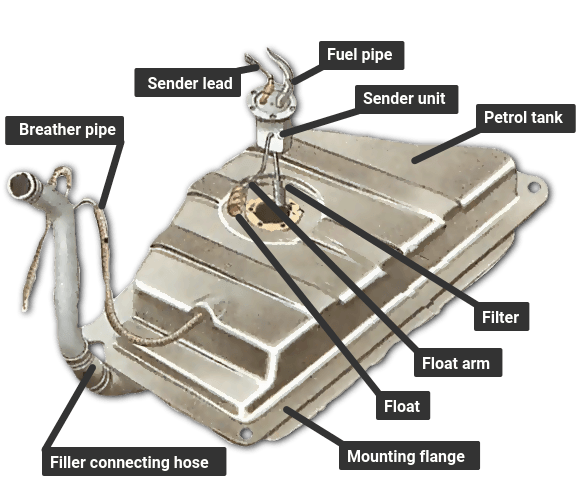
The sender unit may be fitted in the top or the side of the tank. Often it is hard to find, particularly if it is on the top, and you may have to remove some trim from inside the boot.
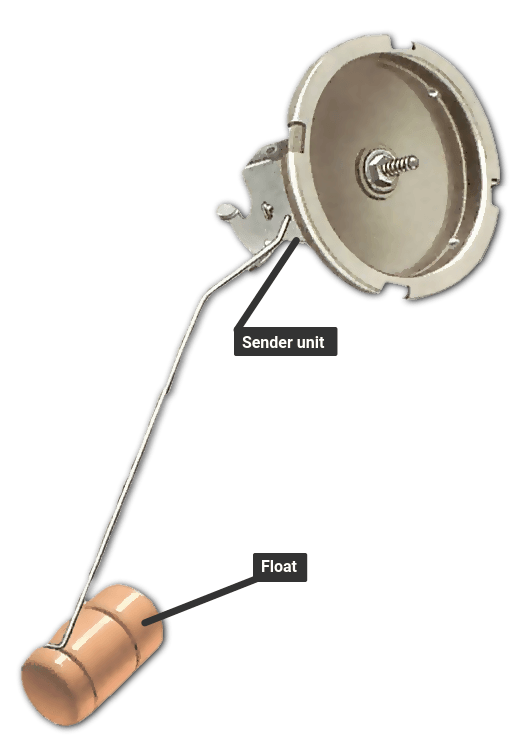
Most senders are circular. Generally the fuel pipe (or pipes, in a circulating system) is connected to it.
There is an electrical connection to the fuel gauge, and sometimes a second one for a low-fuel warning light. Check that the connection is not loose, and that the wiring has not become kinked, or trapped, breaking the insulation and causing a short circuit .
Ask a helper to watch the fuel gauge, then switch on the ignition . Disconnect the fuel-gauge wire from the sender unit and scratch its bare end against the tank, or any other bare metal on the chassis or bodywork, to earth it.
If the gauge needle swings to 'full' although the tank is half-full, there is no electrical fault, but there may be a mechanical fault in the sender unit, such as a detached float .
If the needle stays still, try earthing the wire by touching it to an unpainted point on the car body. If the needle moves now, the tank is not properly earthed. Remove and clean some of its mounting bolts or screws.
If the needle does not move at all, there may a break in the wiring.
Check the wiring to the gauge with a circuit tester - one lead connected to the wire detached from the sender and the other to the terminal on the gauge.
If the tester shows continuity in the wire, the gauge is faulty.
If the sender unit is faulty, fit a new one, but note the safety precautions.
Before you remove the sender unit, take precautions against spilling fuel (see right).
Then disconnect the fuel pipe if necessary, blocking it with a plug or an old pencil. If there are two pipes, mark them.
Disconnect the electric wires. The sender may be fixed by screws or by studs and nuts round the edge. Unscrew them carefully; one snapped stud could mean replacing the whole tank.
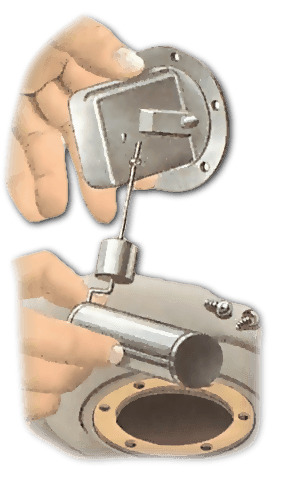
Often the sender has a bayonet fitting, held on to its seating by an outer locking ring with lugs.
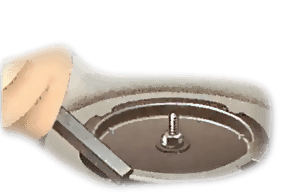
Release this ring by turning it anticlockwise, using a C-spanner.
Alternatively, hold a metal bar against a lug and tap gently with a hammer. Take care not to bend the lug. Take off the sender carefully. Inside there is a long arm attached to a float. If you bend the arm, the gauge becomes inaccurate.
There is usually a tag in the sender hole to ensure that you refit the sender the right way round. Put the sealing ring in place and tighten the nuts or screws in sequence to spread the pressure . Reconnect the fuel pipe and electric wires, refill the tank and check for leaks.
A smell of petrol is most likely to come from a fuel-pipe leak (See Checking fuel pipes ). Check also the flexible hose between the tank and the filler, making sure that its clips are tight. If all these are sound, the tank may be leaking.
Fuel tanks can rust from both inside and outside, particularly at the bottom. Eventually holes may develop. This is not uncommon in older cars, where a series of small pinholes barely visible to the naked eye cause a slow, steady loss of fuel.
If a tank is old and leaky, replace it, not only because of the needless loss of fuel but also because of the risk of fire.
A tank mounted inside the bodywork may be rusted by water trapped in body panels. Make sure that there is no water present, and that drain holes are clear.
Drill extra drain holes if necessary - but be careful of the tank. Plug any new drain holes later with suitably sized rubber bungs.
A tank mounted on the outside usually under the boot or forward of the rear axle - can be dented or holed by knocks , stones or a wrongly placed jack.
A dented tank may give a shorter range between refills, but be serviceable otherwise.
Do not attempt to repair a tank yourself. If it is leaking or rusted through, replace it.
Empty the tank (see Safety precautions above). Disconnect the fuel pipes and wires, and the breather tube if one is fitted.
Loosen the clips on the hose between the filler and the tank, and take off the hose. Renew a perished hose or corroded clips.
Tie a plastic bag over the tank opening, for safety.
The tank may be held by bolts around its flange or by metal straps. Bolts on the outside of the car may have to be loosened with the aid of penetrating oil . Allow the oil a few hours to work.
A tank fitted through the boot floor may have a sealing gasket between the tank and the floor. If it does not have a gasket, seal the joint with mastic.
Bolt in the new tank, then reattach all the connections. Refill with petrol, check for leaks and see that the fuel gauge registers.
A blocked breather in the tank causes the same symptoms as running out of fuel, although the fuel gauge does not indicate 'empty'.
Test by quickly removing the filler cap. If there is a loud sucking noise, the breather is blocked.
The tank may breathe through a vent in the cap. This can become blocked or a new, non-vented cap may have been fitted by mistake.
Many cars have a second, small-bore hose from the top of the tank or filler neck, which may loop up and down to prevent siphoning. Check that it is not blocked by dirt.
A few cars use a broad hose with a closed end. Instead of letting in air, it collapses to equalise pressure. This type is maintenance free.
Remove the top of the pump first. It is held on by a central bolt or screw, except on the SU AU...
For the engine to run smoothly and efficiently it needs to be provided with the right quantity ...
The fuel supply system is generally reliable and any problems that do occur are usually traceab...
The fuel used in a modern car, whether petrol, diesel or even LPG ( Liquid Petroleum Gas ),...