Inspecting the ignition system
The Video Course teaches you everything about modern cars.
Inspect the ignition system whenever you make a general under-bonnet check. It takes only a couple of minutes, and guards against a frequent cause of breakdown.
Check that the low-tension connections are tight and free from corrosion, and that all LT wires have sound insulation and no cracks, kinks or breaks.
Follow with the plug leads and plugs. The leads should be clean, dry and free from cracks or kinks.
If there are special guide clips, the leads should run inside them: the clips are to keep them away from each other and from hot surfaces.
Clean the leads with a soft cloth. Replace them if they are damaged or if the wrong type has been fitted at some time. High-tension leads should be replaced every two or three years, to maintain peak performance (See Fitting new high-tension leads ).
Check that the plug caps are firmly fixed to the leads, and that the leads are properly connected to the distributor .
Take care not to get the connections mixed up — tag them with sticky tape if necessary.
Leads may be screwed into the distributor vertically with threaded collars; pushed in vertically and held by crimped terminals ; or inserted from the side and held by small screws.
Check the distributor and plug caps for cracks. Pull off the plug caps one at a time — pulling the cap, not the easily damaged lead — and wipe the porcelain plug tops.
Take off the distributor cap . It may have a pair of spring clips which you lever off outwards, or two small screws — avoid dropping these.
Check the inside of the cap for cracks. Look closely at the contacts.
If there is a sprung carbon brush at the top, it should be free to slide up and down; or there may be a spring contact on top of the rotor arm, which bears against a fixed carbon brush in the cap. The rotor-arm spring contact should be free from wear or damage.
The rotor-arm tip and the contacts around the inside of the cap should not be more than slightly pitted, and the gap between tip and contacts must not vary.
If the rotor-arm tip is dirty, lift off the arm (a few types have screws) and clean it by removing the pitting marks by gentle filing or scraping.
Remove any corrosion from the contacts inside the cap by gentle scraping.
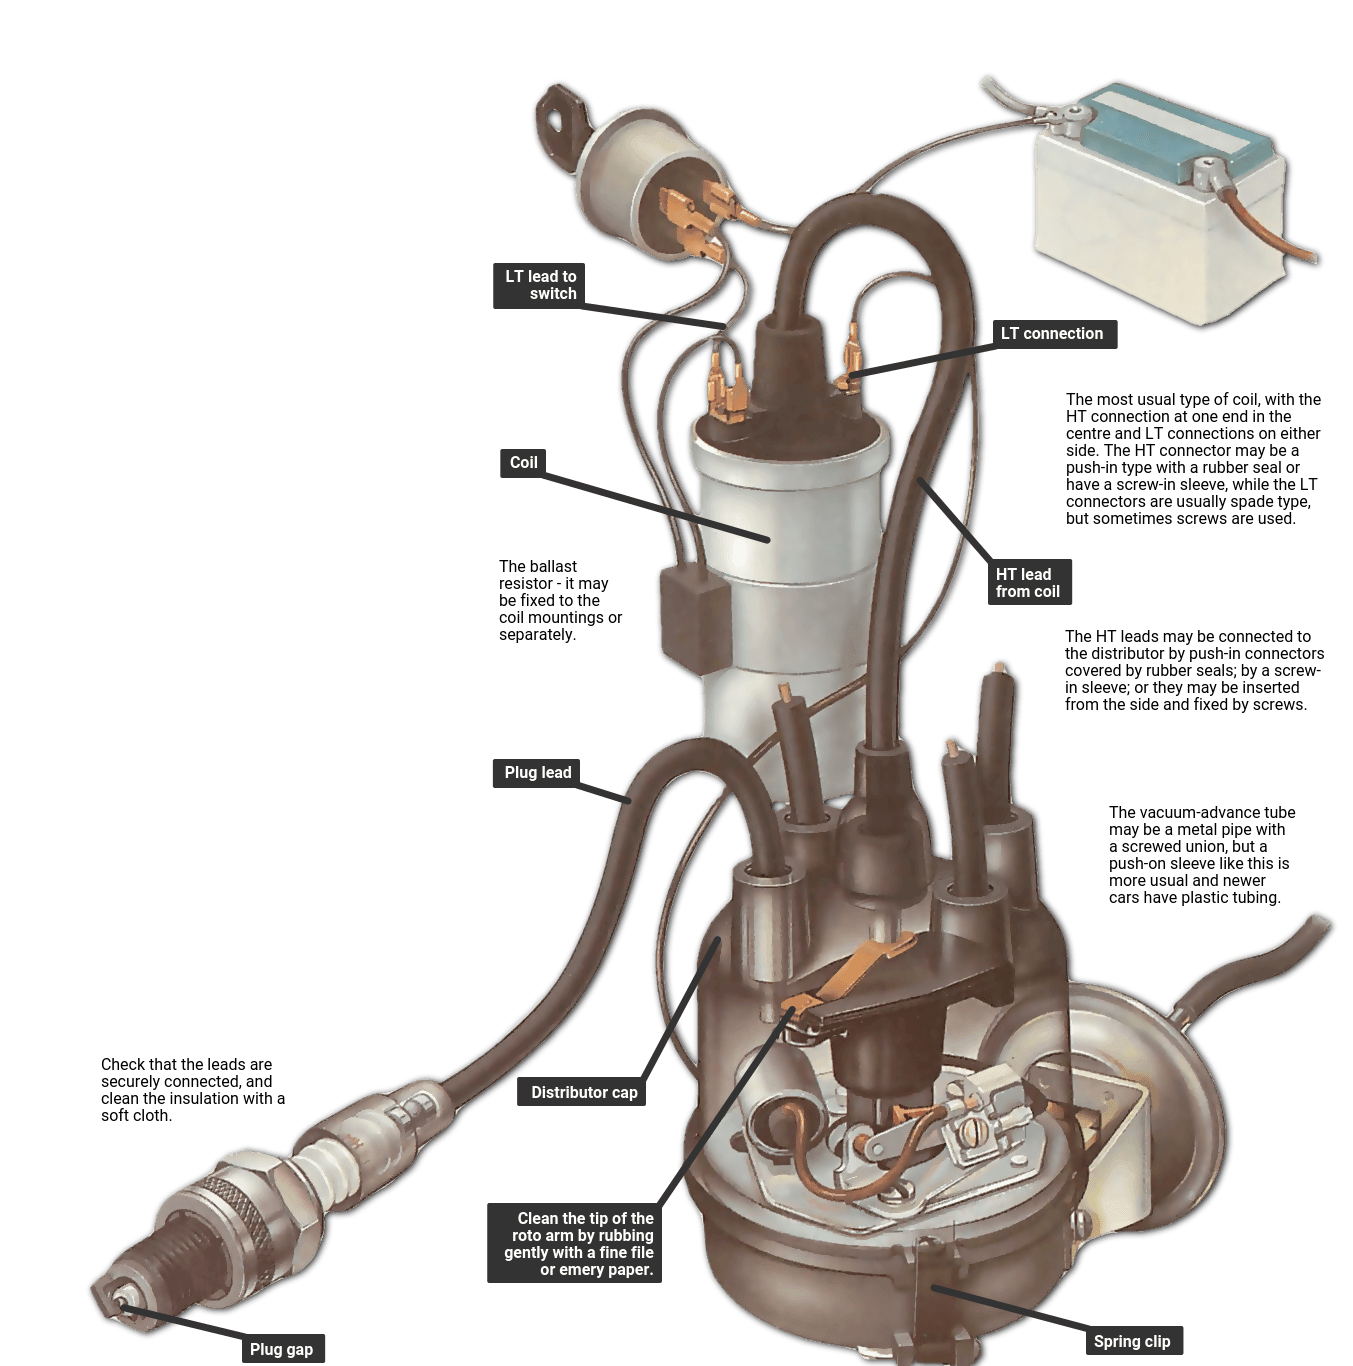
The narrow pipe or pipes of the vacuum advance mechanism run from the distributor to the inlet manifold . Older cars have a metal pipe with a screwed union or a push-on rubber sleeve connector.
Most have a plastic pipe which is a push-on fit .
Check that the pipe is undamaged and that the connections are sound. A plastic pipe must be routed away from heat.
If you have any doubt about the soundness of the pipe or connections, only a stroboscopic timing test (See Stroboscopic timing ) can make sure.
Look at the coil . The most usual type has a thick HT lead coming out of the end flanked by two smaller LT leads.
The HT lead may be a push-in fit or have a screw collar. Check that it is firmly fixed to both coil and distributor, and that any rubber seals over the ends fit properly.
The LT leads have spade connectors, or screws on older cars. Make sure these are firmly fastened, and that the leads are connected the right way round: a coil connected backwards still works, but could cause a misfire.
On a modern negative-earth car the positive terminal, marked +, is connected to the ignition switch ; the negative, marked —, to the contact-breaker points in the distributor.
For positive-earth cars — usually earlier models — they are connected the opposite way round.
Some terminals are marked 'SW' ( switch ) and 'CB' (contact breaker) usually on earlier cars.
Make sure that the coil is fixed firmly in its mountings.
Most coils have a ballast resistor — a small porcelain block containing a wire coil and connected by spade or screw terminals into the LT lead to the switch.
There are two leads from the switch to the coil; one for normal running going through the resistor ; the other for starting, which bypasses the resistor to provide extra ignition strength.
The resistor is often clamped to one of the coil mounting bolts. Make sure it is not cracked, and that the connectors are tight. Some cars have a resistive lead from ignition switch to coil instead of a separate resistor.
The last part of the test is optional because you can only do it in the dark — but well worth the trouble. Start the engine and look for ' tracking ' — leakage of high-tension electricity from the coil, distributor, HT leads or plugs, caused by damaged or wet insulation. It shows up as blue sparks .

The Ultimate Car Mechanics video course
Learn everything about modern cars from our new video series.
Learn more >-
We build a Mazda MX5 Miata from scratch
We start by tearing down and then rebuilding the whole car.
-
Every part explained
There's ridiculous detail on every part. Clearly and easily explained.
-
All modeled in 3D
We've created the most detailed 3D model ever produced so we can show you everything working.
Super detailed explanations in the video course
15 hours of pro-quality, HD content with subtitles
The
video
course
Bonus: Dismantling the engine

Engine Block

Crankshaft

Tools: Using a tap set

Using an engine stand

The Pistons
