Video Course: Lift installed and ready for equipment and lighting
I'm probably writing about the The Video Course - check it out!
After a solid week of working on the studio, I finished building the two-post lift and it works perfectly. The floor is finished and level, and we are ready to start bringing equipment and lighting into the studio.
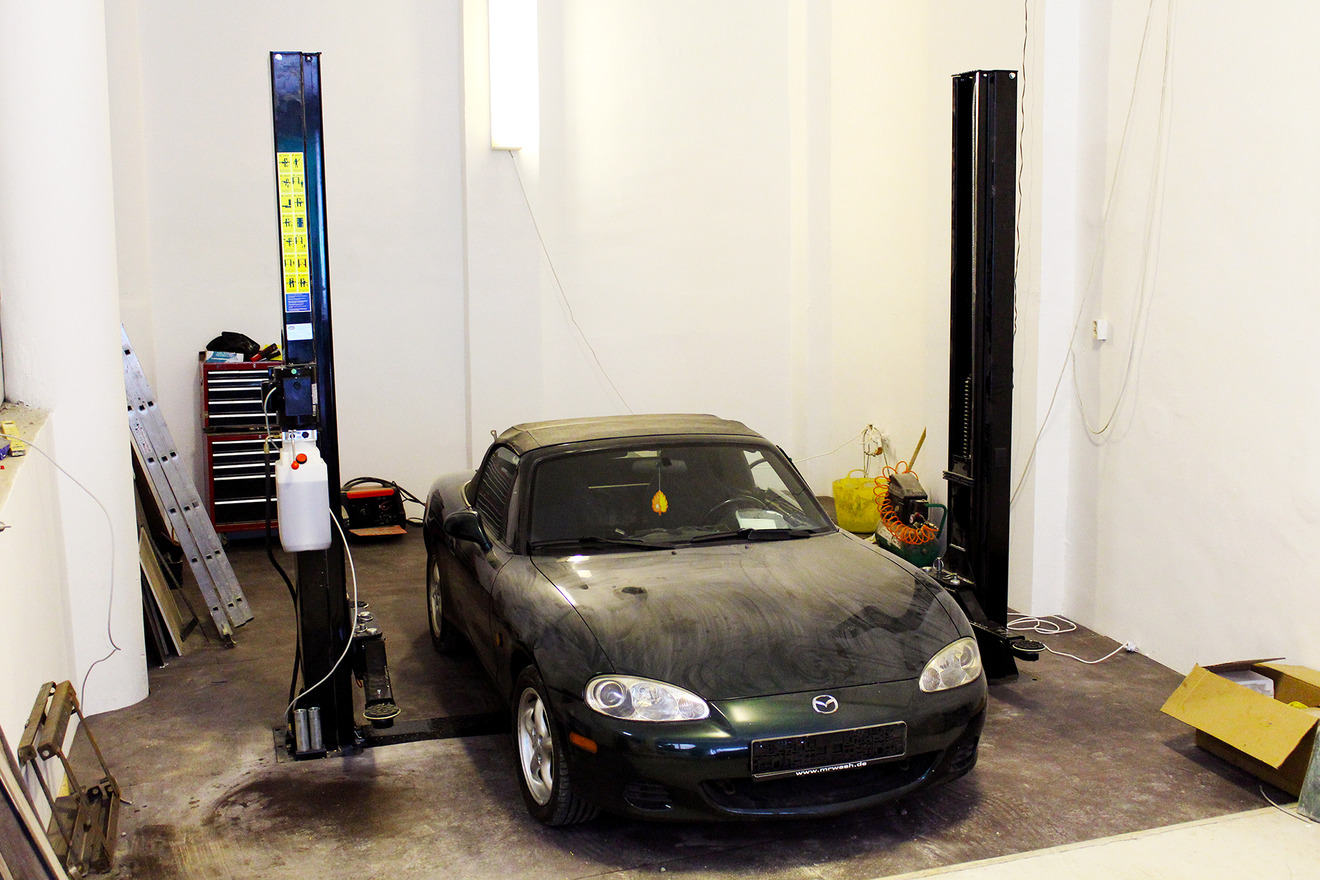
Installing the car lift
Installing the car lift was like building an industrial quality ikea shelving unit. The whole lift weighs in at around 800kg, which didn't seem that much. Until you consider that each post is around 180kg and every other part weighs about 50kg. Putting this thing together on my own was a serious workout. Why put it together myself? I'd asked around for recommendations from of anyone to install it and come up empty handed. And I know from past experience that trusting a random person to do quality work in Budapest is a foolhardy exercise. The only way I can trust my life to this machine is to personally put every piece of it together, and bolt it to a concrete base that I poured myself.
And actually, commissioning this lift was not too hard at all. The hardest part was the foundations - in our case made much more difficult by the existing floor being a ramp and of questionable quality. Here's a summary of what we did to install this.
First up we poured a concrete H-shaped base for it from a strong C20 concrete. Around 200mm deep. In this concrete I embedded some rebar, being careful to avoid places where I'll later drill holes for anchor bolts. J-bolts embedded in the concrete before it is poured would be stronger, but would also require the two posts to be lifted over the bolts to drop them in place - not an easy task. And aligning those J-bolts would have required a lot of prep time. The manufacturer included anchor bolts so that's what I'm using.
Next, you lift the posts into position - they are chunky but a four man team is plenty of muscle for this task. I recruited three homeless lads that I know from the nearest Metro station. I'm always impressed at their knowledge - one of them knew exactly how to carry this using two timbers as bearers. It worked out perfectly. We titled the posts to the upright position and wiggled them into position.
We won't actually bolt down the lift for another two weeks or so - until just before we actually need to raise the car. Concrete is a curious substance. Here's a thrilling graph of the compressive strength of concrete against time.
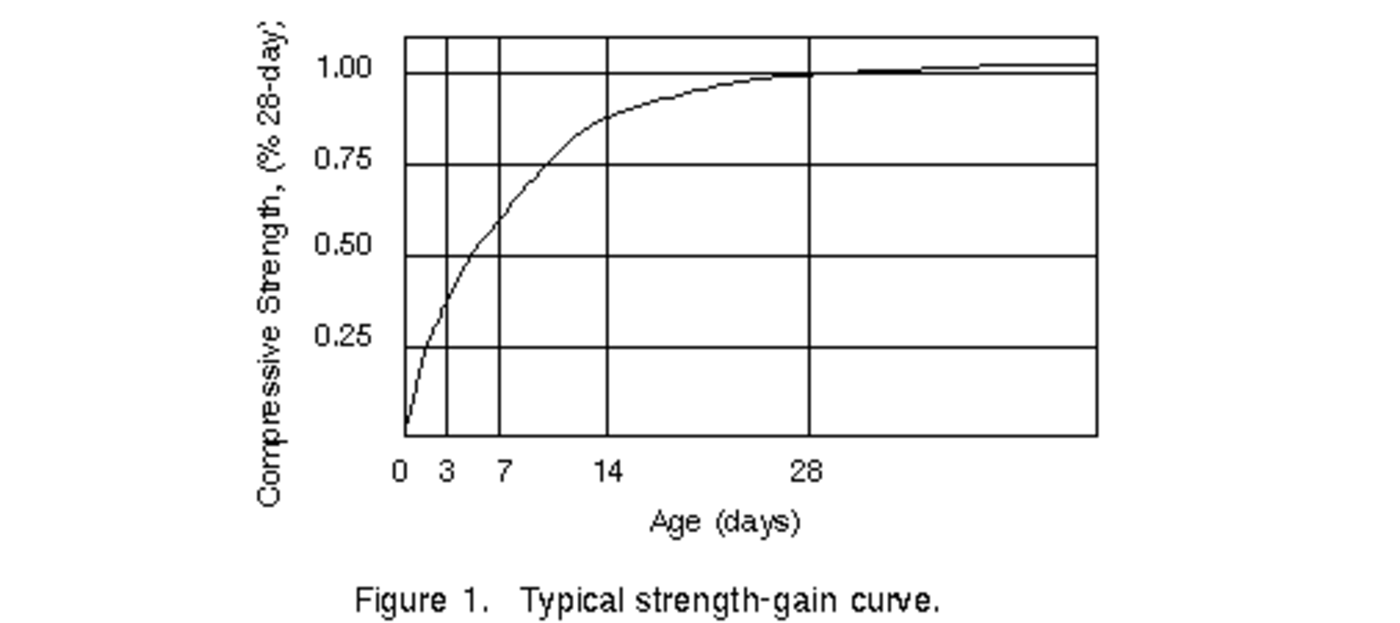
You can see that after about 5 days, it has 50% of its final strength, and after 14 days it has 85% of its strength. 28 days sees the concrete basically fully cured, although it will continue to get slightly stronger for many more years. We're on day 10 and so it's sensible to wait as long as possible before drilling holes and installing anchor bolts. Especially since anchor bolts rely entirely on the compressive strength of concrete when they expand.
With the posts in position, I installed the heavy hydraulic pistons that lift the car, then the steel cable's which keep both sides synchronized at the same level. The hydraulic pistons are powered by a 2hp electric motor which pumps hydraulic fluid through two hoses, so I connected these up and filled the tank with hydraulic fluid. Having wired it in to the power supply, I tested it and it works perfectly. The lift clicks up a ratchet as it raises and when the car is in position, it is the ratchet that takes the weight of the car. We'll make a video about how the car lift works later.
It's hard to emphasise how well engineered every part of this thing is - every piece of it is made of 12mm (1/2 inch) thick steel. The capacity is 4500kg, but the Mazda is only 1000kg and so it will be an effortless lift (once bolted down).
With the lift installed, we finished the floor and ordered some rigging for the lighting that can be suspended from the ceiling. This should make filming much easier as we won't need to constantly move lights and stands around.
To finish the week, I braved a Sunday at Ikea to buy rows of steel shelving because we have to store a lot of parts between taking the car to pieces and putting it back together again - it's going to be a tricky enough task without having it all in a jumble on the studio floor.
Next week
Tomorrow we receive an engine crane, engine stand, and parts washer. We'll get this installed, set up the lighting and then it's time to start filming. I can't wait.
Related
Studio3: Bigger and better
- Author
- Alex Muir
- Written
- 8 March 2020
I finished 14 hours of automotive engineering videos for the video course back in October. It's been a hectic few months and I'm finally ready to share some pretty exciting news: I've moved the video production to the UK. To Manchester, to be precise. And I'm building a proper studio where we can be more productive, more creative and shoot in even better quality. Read more
Why I chose an MX5 Miata for the video series
- Author
- Alex Muir
- Written
- 18 May 2019
I've had quite a few questions from people about why I chose to use an MX5 Miata for the video series. Was it sponsored? Am I an expert with them? Because I love them? The answer is... it just seemed the best choice at the time. Now, with hindsight, I realise it was the best possible choice in the world. Here's the story... Read more
Course progress: March 2019
- Author
- Alex Muir
- Written
- 9 March 2019
We've been filming and releasing videos every week since getting into the new studio. The course now has 9.5 hours of pro-quality video, fully subtitled and I'm really proud of what we're producing! We're using CGI anywhere it helps understanding, and the general quality and feel of the videos is at an all-time high. Read more