Adjusting the clutch
The Video Course teaches you everything about modern cars.
To work efficiently, the clutch needs the right amount of play in the linkage between the foot pedal and the clutch operating lever (also known as the release arm or fork).
Anything less than the correct amount o free play (or clearance ) will result in clutch slip, because the pressure plate will be unable to exert its full pressure on the friction plate .
Failure to cure this fault will quickly lead to a burned-out friction plate, and possibly a ruined pressure plate.
If, however, there is too much clearance in the clutch linkage , the car tends to creep forwards when in gear with the clutch pedal fully depressed.
This is known as clutch drag, and it can cause difficulties in heavy traffic.
It is generally better, however to have too much play in the clutch linkage than too little.
The linkage should be checked and, if necessary, adjusted about every 6,000 miles or 10,000km, or as specified in the maker's service schedule. Wear on the friction plate and on the linkage will eventually alter the maker's setting.
Most modern cars have a diaphragm-spring clutch operated either mechanically or hydraulically.
On most cars, mechanical clutch-linkage clearance is measured and adjusted underneath the car. On some the makers advise checking free play a specific measurement between pedal positions - at the pedal, although adjustment may be made underneath
On some cars - many Hondas and Toyotas, for example - checking and adjustment can be done at the bulkhead under the bonnet.
Wherever adjustment is made, the same principles apply to all cable linkages. They are adjusted by either increasing or decreasing the lengths of the inner and outer cables in relation to each other. If there is not enough clearance in the linkage, the inner cable has to be made longer. If there is too much, it has to be made shorter.
Check your car handbook or service manual to find the exact amount of clearance required and how it should be measured.
In an emergency, as long as you ensure that there is play in the linkage, the clutch should perform well enough. Check it and adjust to the correct clearance as soon as possible.
On a few old cars, such as the Vauxhall Cavalier, there is a constant-contact release bearing - this is adjusted to give no free play at all in the linkage.
Although some hydraulic clutches can be adjusted, many are self-adjusting. Check in your car handbook or service manual.
If slip occurs on a self-adjusting clutch, the clutch has to be overhauled. If drag occurs, the hydraulics may be at fault (See Checking and removing a clutch master cylinder ). Otherwise, renew the clutch.
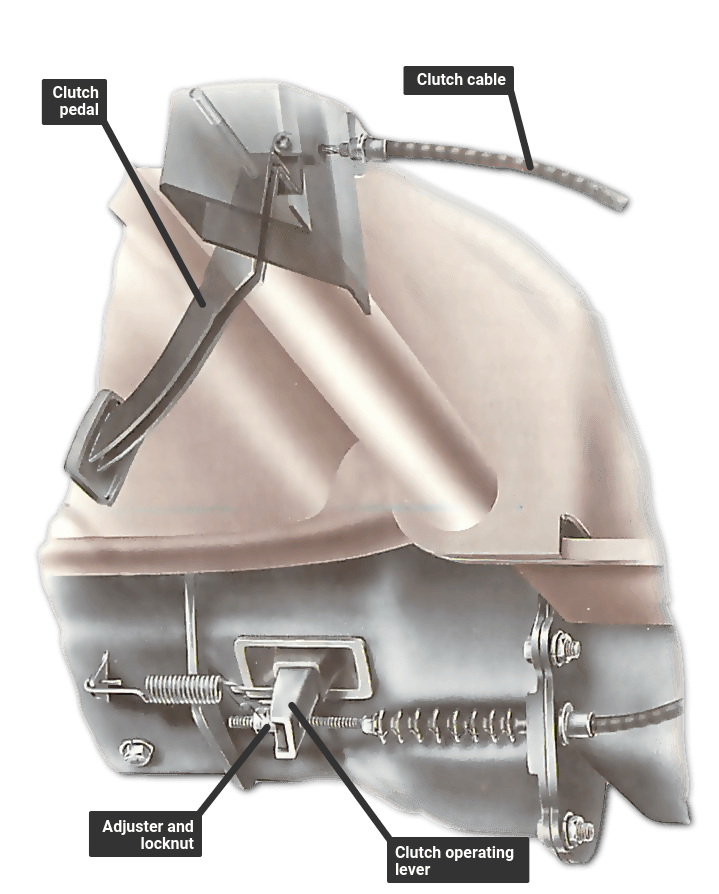
Mechanical clutch linkage
The typical conventional clutch linkage is an inner cable sliding in an outer sheath. The top end of the cable is attached to the clutch pedal and the bottom end to the clutch operating lever. The adjustment to the spring-loaded travel of the lever is normally made by means of a locknut, either at the point where the cable is attached to it - as shown here - or at the other end of the cable where it is attached to the engine-bay bulkhead.
Adjustment is made for clearance (free play) - the distance the cable travels before moving the lever.
Adjusting the clutch on a transverse engine
Checking cable clearance
The cable clearance on a mechanical clutch may be checked and adjusted underneath the car in a variety of ways, depending on the make. Three common methods are shown here: first, measuring the change in cable length when the clutch lever is operated; second, measuring between the adjuster nut and lever; third, measuring between the adjuster nut and cable stop.
On some cars, it may be possible to use either of the methods shown for checking and adjusting at the lever.
But the measurement must be taken between the points given in the car handbook or service manual for comparison with the specified figure.
Raise the car securely on ramps or axle stands, with the handbrake applied and the wheels chocked.
Checking and adjusting at the clutch lever
Locate the clutch cable, which loops down from the clutch pedal to protrude through the clutch operating lever. There is a threaded sleeve with two nuts on it at the protruding end of the cable.
The clearance is the difference between the cable measurement when the operating lever is at rest and when it is pushed inwards.
To measure it, hold a ruler flat alongside the cable between the operating lever and another point of reference, such as the edge of the bell housing .
Gently push the lever inwards as far as it will go, align the ruler with the end of it, and measure the distance between the lever and your point of reference.
Pull the arm outwards until it is at rest, then measure the same distance again. Find the difference between the two measurements and compare it with the maker's specified figure.
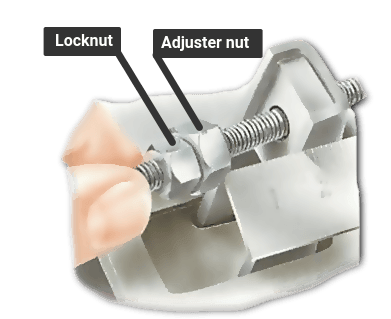
If the clearance needs adjustment, loosen the outer nut on the threaded sleeve, which is the locknut (on some VW cars it is a wingnut).
Then screw the adjuster nut either forwards or backwards to decrease or increase clearance, checking the measurement as necessary.
When the measurement is correct, tighten the locknut and depress the clutch pedal several times. Check the clearance again, and readjust if necessary.
On some cars with a protective undertray, the locknut may not be easy to reach and turn. If so, you will need a special spanner incorporating a socket and universal drive to undo it.
Another method of checking and adjusting at the operating lever
Locate the place where the clutch cable protrudes through the operating lever with the adjusting and locking nuts on a threaded sleeve.
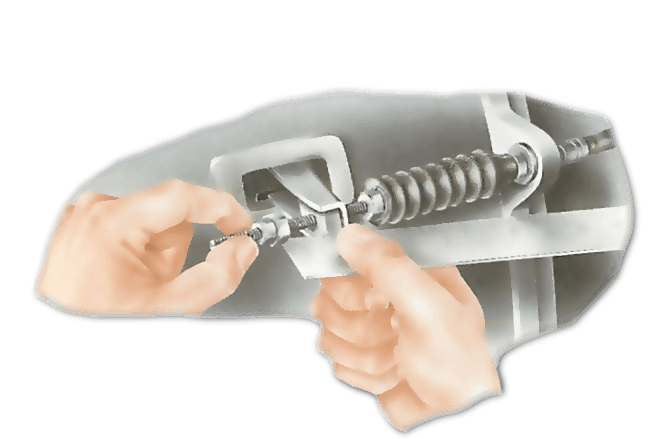
Use pliers to unhook the pull-off spring from the clutch operating lever. Grasp the threaded end of the cable (use pliers if necessary). Pull it as far back as it will go; this will raise the clutch pedal to its limit. With the cable pulled back, use a ruler to measure the distance between the adjuster nut and the inner edge of the clutch operating lever.
This is the clearance measurement. Compare it with the figure specified in the car service manual or handbook.
If adjustment is needed, do it in the way described under Checking and adjusting at the clutch lever.
Checking and adjusting at the outer-cable stop
This method is used on some old cars. Wedge the clutch pedal in the fully raised position with a block of wood.
Locate the clutch cable and find where the outer cable is seated against its cable stop on the edge of the bell housing.
The locknut and the adjuster nut are at the end of the outer cable, next to the cable stop.
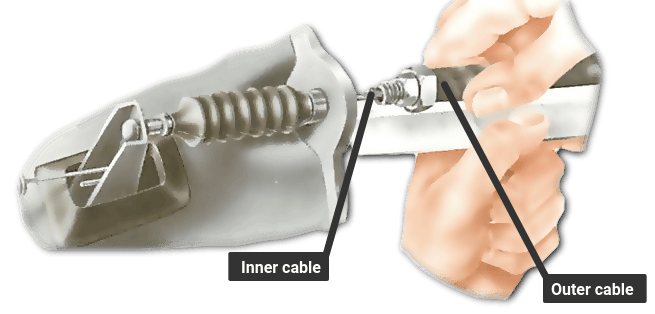
Hold the outer cable and pull it backwards as far as it will go, exposing the inner cable.
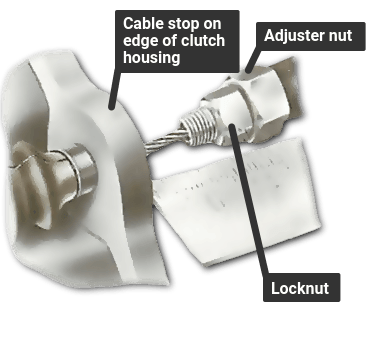
With the outer cable pulled back, use a ruler to measure the distance between the cable stop and the adjuster nut on the end of the outer cable.
This measurement is the cable clearance. Compare it with the maker's specified figure and adjust if necessary.
Loosen the locknut and turn the adjuster nut either backwards or forwards until the measurement is correct.
Tighten the locknut and check the measurement again.

The Ultimate Car Mechanics video course
Learn everything about modern cars from our new video series.
Learn more >-
We build a Mazda MX5 Miata from scratch
We start by tearing down and then rebuilding the whole car.
-
Every part explained
There's ridiculous detail on every part. Clearly and easily explained.
-
All modeled in 3D
We've created the most detailed 3D model ever produced so we can show you everything working.
Super detailed explanations in the video course
15 hours of pro-quality, HD content with subtitles
The
video
course
Bonus: Dismantling the engine

Engine Block

Crankshaft

Tools: Using a tap set

Using an engine stand

The Pistons
