Checking and renewing brake cables
The Video Course teaches you everything about modern cars.

Handbrake cable layouts vary from car to car, but have only a limited range of types of component.
Although you may, for example, find an adjuster screw almost anywhere between the brake lever and the wheels, it can be treated in much the same way.
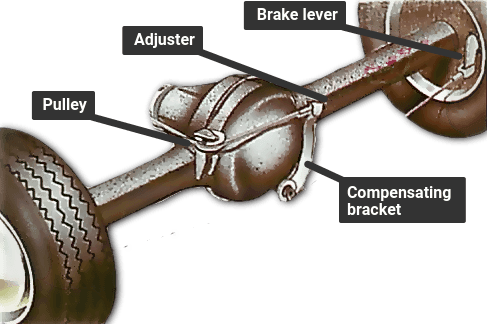
Even on the few cars where the handbrake works on the front wheels the system is similar.
Cables stretch slightly with use. They need regular checking and lubrication, and adjustment when necessary (See Adjusting the handbrake ).
Check every six months, 6,000 miles, or 10,000 km — or if you feel that the handbrake has become weak.
A more serious problem is fraying cables, which can suddenly break. Moving parts may also rust and stick, so that the handbrake cannot be applied or released fully.
Loosen the wheel nuts of the (hand- braked) wheels before raising that end of the car, and chock the other wheels on both sides. Raise the car on axle stands placed so as not to get in the way of the mechanism. Remove the raised wheels.
Look over the whole length of the cables for fraying, particularly at sharp bends.
Check for cracks where cables run inside a flexible outer casing — they can let in water and cause rusting.
See that all parts are clean, sound and lubricated. If necessary, smear them with brake or anti-seize grease.
At longer intervals — about every two years — dismantle all the moving parts, using the same method as for renewing a cable.
Clean everything thoroughly and check it for wear.
One common trouble, which reduces braking power, is clevis pins becoming `waisted' — worn away in the middle.
Renew a waisted pin and always use a new split pin or spring clip when reinserting a clevis pin.
Grease all parts during reassembly, including the threads of adjusters.
Replacing a handbrake cable
Cable layouts vary, so make careful notes or drawings as you dismantle one, to avoid confusion later.
One or two cables may run back from the lever. They usually start above the floor and pass through it at points covered by a fixed guide plate .
Twin cables are fixed, usually via adjuster screws, to either side of the lever. Each cable goes to one of the brakes. They are adjusted separately.
A single (primary) cable is fixed to an arm below the lever, usually by a clevis pin. There may be an adjuster here. Sometimes there is a rod rather than a cable.
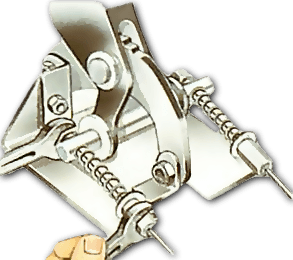
The rear end of the cable may carry an 'equaliser yoke' — a transverse sliding guide.
Another ( secondary ) cable runs freely across the equaliser, each of its ends being connected to one of the brakes so that this Y- shaped arrangement divides the pull equally between them.
There is usually an adjuster for the primary cable in front of the equaliser, and for the secondary cable on one side only.
Often, you remove an equaliser to free the cable from it.
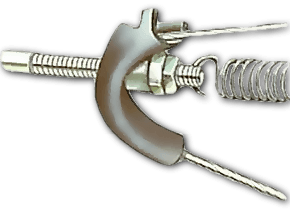
Parts of either cable may run inside flexible outer casings. The casings are held at their ends by abutment brackets on the frame .
Usually, one end of a casing is a long, threaded tube which can be adjusted on the bracket by locknuts.
Some cars — for example the VW Beetle — have rigid outer tubes instead. When removing a cable from such a tube, tie a string to the cable, draw the string through the tube and leave it in place to pull the cable back.
Instead of a Y-shaped equaliser layout, some cars have a single cable linking the brakes around an equaliser fixed to an adjustable rod on the handbrake lever.
On other cars the primary cable runs either directly to the rear axle, or to an adjustment point where it works a secondary cable leading to the rear axle.
The cable runs around a compensating bracket, sometimes via a pulley, and to one of the brakes.
From the bracket a third cable (or sometimes a rod) runs to the other brake, in such a way that the compensating bracket equalises the pull between the brakes.
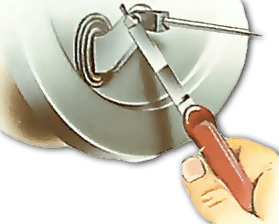
A cable may be connected to the brake itself outside the drum or caliper , usually by a clevis pin. Often a drum has an inside connection, in which case you have to remove the drum (See Renewing drum-brake shoes ), and also usually a spring and sometimes a clip inside the drum.
Whatever the details, all connections are by normal clevis pins with split pins or spring clips, by ordinary nuts, bolts and screws.
So long as you note the details, handbrake reassembly should not be a problem. Always renew all split pins and spring clips.

The Ultimate Car Mechanics video course
Learn everything about modern cars from our new video series.
Learn more >-
We build a Mazda MX5 Miata from scratch
We start by tearing down and then rebuilding the whole car.
-
Every part explained
There's ridiculous detail on every part. Clearly and easily explained.
-
All modeled in 3D
We've created the most detailed 3D model ever produced so we can show you everything working.
Super detailed explanations in the video course
15 hours of pro-quality, HD content with subtitles
The
video
course
Bonus: Dismantling the engine

Engine Block

Crankshaft

Tools: Using a tap set

Using an engine stand

The Pistons
