Checking a starter circuit
The Video Course teaches you everything about modern cars.

If the starter does not turn the engine although the car battery is in good condition, the fault may be a simple mechanical one or it may be an electrical one in the starter-motor circuit .
The starter system is simple, and the checks on it are straightforward. Electrical checks are made with a circuit tester or test lamp or with a voltmeter .
A mechanical check to see if the starter pinion gear is simply jammed in mesh with the engine flywheel can usually be made with a single spanner.
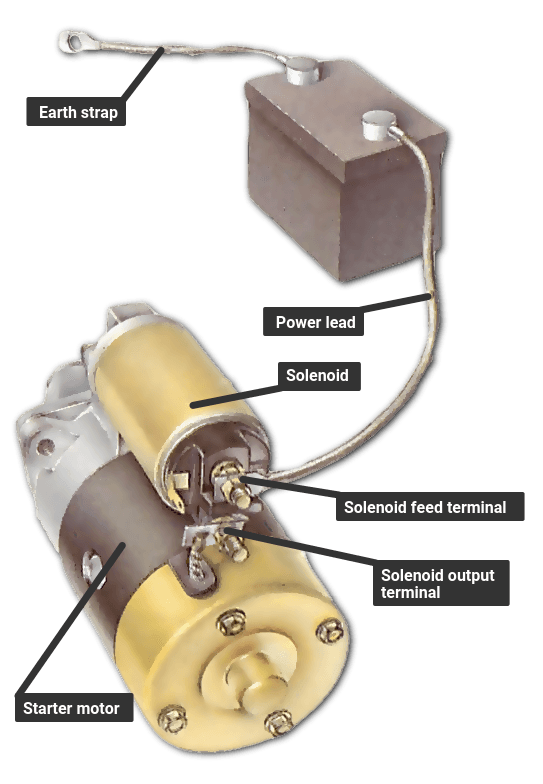
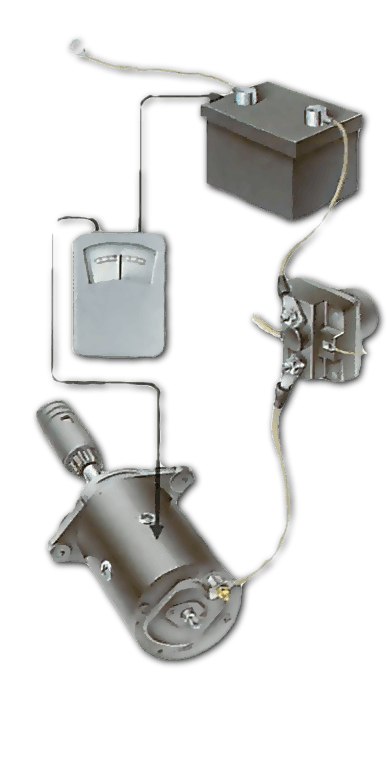
The live terminal on the battery is connected by a heavy lead to a terminal on the solenoid switch which is operated when the ignition switch is turned. The other terminal on the solenoid is connected to a terminal on the starter motor .
The second terminal on the motor is earthed via a wire strap through the engine or gearbox and the car bodywork back to the earth terminal on the battery.
Modern cars have a pre-engaged starter, which has the solenoid mounted on the casing. Many older cars have an inertia starter, which has a separate solenoid mounted elsewhere in the engine compartment.
Checking the starter pinion
Switch on the headlights and try the starter. If the headlights dim, the starter pinion is probably jammed in mesh with the flywheel.
See if there is a square stub on the end of the starter-motor spindle . If so, turn it with a spanner to free the pinion.
Do not work the starter switch until the pinion has been freed.
If there is no square stub and the car has manual transmission , with the ignition switched off put the gear lever into second gear, release the handbrake and rock the car forward and back until the pinion frees itself.
If the car has automatic transmission , you have to take the starter motor off (See Checking and replacing the starter motor ).
If the headlights do not dim, look for an electrical fault.
Checking for electrical faults
First check the battery and its terminals (See Checking the batteries )and the other end of its earth strap.
Use the circuit tester or test lamp to find if electric current is reaching the solenoid.
Connect one lead to the feed terminal (the battery side of the solenoid) and earth the other to bare metal on the bodywork.
The lamp should light. If it does, the fault is in the solenoid or in the starter itself.
If the lamp lights when you earth it to the body, but not when you earth it to the engine, the engine earth strap is faulty. It may have a loose bolt with dirt underneath, causing bad contact.
If the lamp does not light, the connections between the battery and solenoid are faulty.
Checking the solenoid
To check that the solenoid is working, listen to it while a helper works the starter switch. The solenoid will click as the contacts close if it is working. If it does not, the fault may be in the ignition switch or its terminals, the wiring to it or the solenoid itself.
Check the ignition switch and its wiring (See Inspecting the ignition system ).
To check that the solenoid is delivering current to the starter motor, connect the test lamp between the output terminal of the solenoid (leading to the starter) and earth, preferably the battery earth terminal. Working the starter switch should light the lamp.
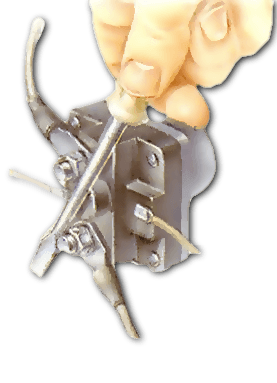
If the lamp does not light, put the car in neutral gear (or Park on an automatic), turn off the ignition and cautiously try to bridge the two main terminals on the solenoid. This bypasses the switch contacts inside the solenoid.
Use a strong screwdriver with an insulated handle. Do not touch the blade. Peel back the rubber terminal covers and jam the blade for just a moment between the terminals.
There should be a spark , and the starter may turn. If it does, the solenoid is faulty. If not, the fault is in the starter motor. For repair.
Testing the circuit with a voltmeter
Switch on the headlights and try the starter. If the headlights dim, check the starter pinion (See Checking battery leads and connections ), its terminals and its earth strap.
If the battery appears sound, test with a voltmeter as described below.
First prevent the engine from starting by disconnecting the feed wire to the coil . It is marked SW or + (on negative-earth cars).
Checking at the battery
Connect the voltmeter leads across the battery terminals, positive to positive (+), negative to negative (-). The dial reading should be 12 volts or more.
Work the starter switch, and the reading should fall, but not below 10.5 volts. If the reading does not fall, there is a fault in the ignition-switch circuit or in the solenoid.
If the reading falls below 10.5 volts and the starter turns slowly or not at all, the battery is probably flat.
If the reading falls below 12 volts but remains above 10.5 volts while the starter turns slowly, there may be a high resistance somewhere in the circuit; it should be revealed in later tests. Or there may be a mechanical seizure in the starter or the engine, which stops it from turning freely.
Checking at the starter
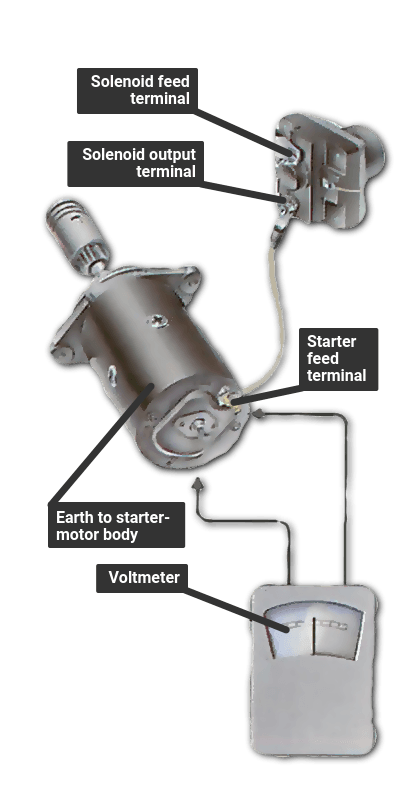
Test the voltage reaching the starter. For a negative-earth system on a car with a pre-engaged starter, connect the positive lead of the voltmeter to the feed terminal on the solenoid. On a positive-earth system, carry out this and the following tests with the voltmeter leads reversed.
If the car has an inertia-type starter, connect the positive lead to the feed terminal on the starter motor.
Touch the negative lead to a bare metal part of the motor for a moment the voltage should drop, but not more than half a volt lower than in the previous test. If it was previously 11 volts, it should remain above 10.5.
If the reading is above the 10.5 margin, there are no faults in the starter circuit and the trouble is in the motor, the solenoid or the engine.
If there is a steep voltage drop (to lower than 10.5 volts) something is causing a high resistance in the starter circuit.
Connect the negative lead of the voltmeter to the live terminal of the battery, and the positive lead to the starter-motor feed terminal (on a pre-engaged starter this is the solenoid feed terminal).
It should read 12 volts, then when you work the starter switch drop to below 0.5 volts. If it does not drop, first check the solenoid.
Checking at the solenoid and other parts
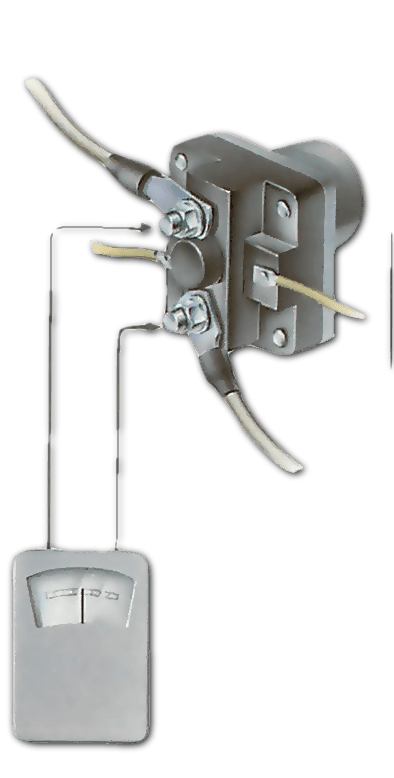
Connect the voltmeter across the solenoid terminals, the negative lead on the feed (battery) side, the positive on the starter side.
Switch on the ignition switch - if the voltage still does not drop below 0.5 volts, the solenoid or the ignition switch or its connections are faulty.
To test other parts of the ignition-switch circuit, check that their connections are clean and tight, then bridge with the voltmeter.
If the voltage does drop below 0.5 volts, there is probably a fault somewhere else in the supply side of the circuit, such as poor connections to the live side of the battery, at the solenoid, or between the solenoid and the starter motor.
Take the connections apart, clean them and refit tightly.
Checking the earthing of the circuit
To check whether there is high resistance in the wiring on the earth side of the circuit, connect the positive lead of the voltmeter to the negative-earthed terminal of the battery, and the negative lead to the body of the starter.
Working the starter switch should cause a drop from 12 volts to below 0.5 volts.
If the voltmeter reading stays above 0.5 volts, look for a bad connection at the battery earth strap (at either end) or the engine-to-body earth strap.
Clean and tighten the connections, and carry out the test again.
If all these tests have not found the trouble, it must be in the starter motor itself (See Checking and replacing the starter motor ), or just possibly a seized engine.

The Ultimate Car Mechanics video course
Learn everything about modern cars from our new video series.
Learn more >-
We build a Mazda MX5 Miata from scratch
We start by tearing down and then rebuilding the whole car.
-
Every part explained
There's ridiculous detail on every part. Clearly and easily explained.
-
All modeled in 3D
We've created the most detailed 3D model ever produced so we can show you everything working.
Super detailed explanations in the video course
15 hours of pro-quality, HD content with subtitles
The
video
course
Bonus: Dismantling the engine

Engine Block

Crankshaft

Tools: Using a tap set

Using an engine stand

The Pistons
