How to fix an indicator stalk
The Video Course teaches you everything about modern cars.

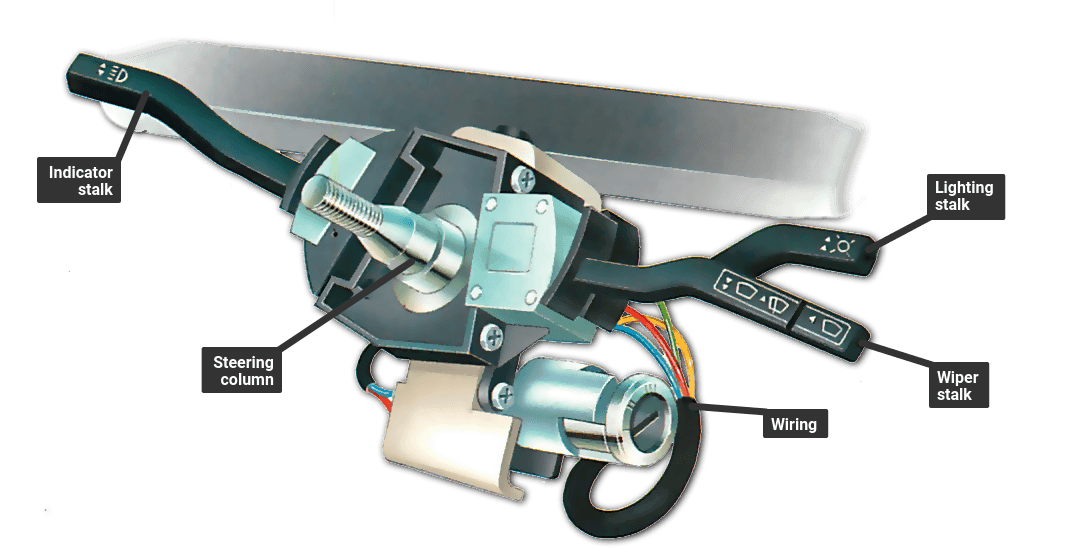
The majority of indicator stalks are mounted on the side of the steering column so you can easily operate them without having to release your grip on the steering wheel. Most modern stalks also have a self-cancelling device that is operated by the moving part of the steering column. This automatically switches the indicators off after you have turned into a bend.
Indicator stalks are usually trouble-free but, like everything else, they can develop problems. In addition, the stalk often controls other items like headlight dip/main beam and flash, and the horn .
The most common problem is the self-cancelling mechanism failing to work when the steering wheel is turned back to the straight ahead position after a turn.
Other problems you may come across are a burnt-out or broken switch or wiring, a broken switch mechanism or a broken stalk.
Gaining access
Before carrying out any work on the stalk disconnect the battery leads as a safety precaution against short circuits .
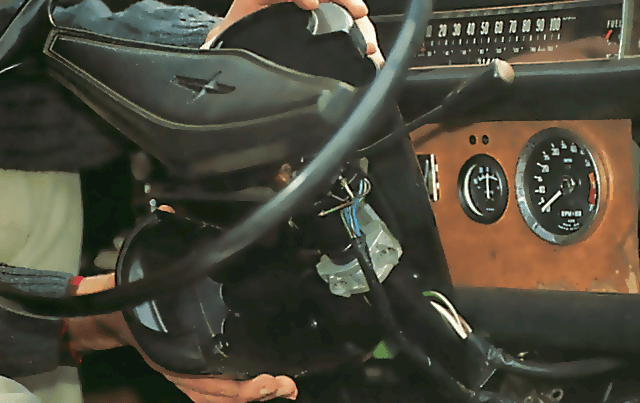
On the majority of cars you have only to remove the steering column shroud to gain access to the indicator stalk switch mechanism. But in some cases you will also have to remove the steering wheel (for details see Projects 2).
The shroud is usually in two halves held together, and to the column, by small screws. Look around the shroud to find these screws - some may be deeply recessed in the shroud moulding. After all the screws have been removed the column shroud should split apart.
You may have to wriggle the shrouds off over the various stalks and the ignition switch , so take care not to break them. In some cases the entire column will have to be lowered to remove the shrouds. You should now be able to see the indicator stalk switch.
Switch check
The stalk may perform other functions apart from operating the indicators, in which case you will find several wires leading to it. Refer to the wiring diagram in your service manual to identify the indicator wires.
There are usually three wires attached to the indicator switch: one feed wire to the switch and two wires leading from it to feed the right- and left-hand circuits .
Look carefully to make sure none of the wires has fallen off or broken. If one of the wires has fallen off, solder it back on to its terminal . You may be able to do this with the switch in place but, if not, remove the switch first.
If one of the wires has broken, fit in a new section - again it may be easier to remove the stalk first.
Circuit testing
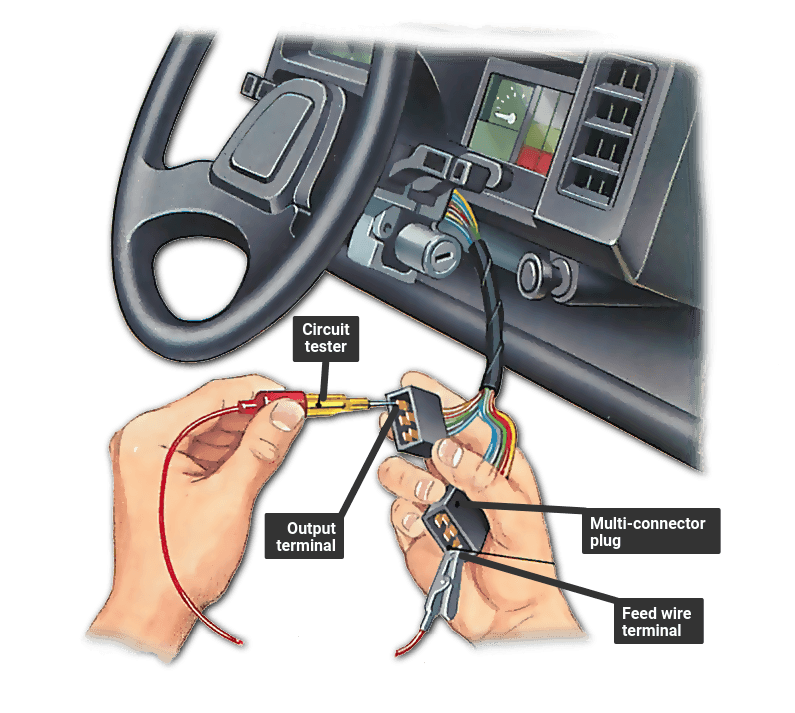
Before removing the switch/stalk assembly for closer inspection it is worthwhile making a circuit check on the switch using a circuit tester (one with its own power supply).
Refer to a workshop manual to find out where the wiring to the stalk is located. Most stalks are connected via a multi-connector plug under the dashboard .
Disconnect the multi-plug and, again referring to your workshop manual, identify the wires running to the stalk.
Connect the test meter to the main switch feed terminal and the output wire for the left-hand indicator circuit. Turn the indicator stalk to the left-hand turn position.
If the circuit tester illuminates, the wiring to and inside the switch are okay. If the circuit tester fails to light, it indicates a fault either in the switch itself or in the wiring between the switch and the multi-plug.
Repeat the test, this time moving the probe of the test meter to the right-hand terminal in the multi-plug and the stalk to the right-hand turn position.
Any faults found will mean the switch/stalk will have to be removed for closer inspection.
If you found the wiring or switch was burnt out, the problem may have been in the switch itself but it is worth checking the circuits to find if the cause lies elsewhere.
Removing a stalk
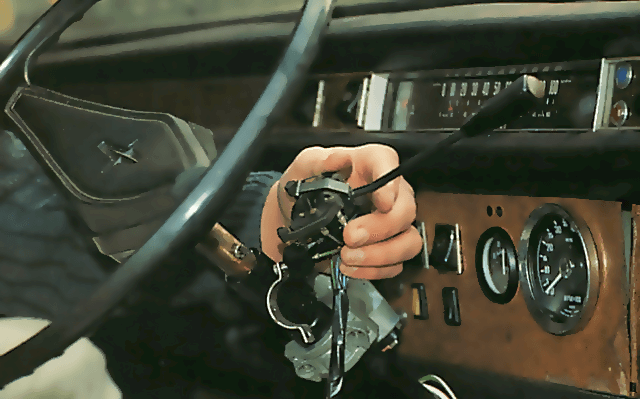
Before removing the stalk, disconnect the battery again. Examine the stalk and switch assembly. There are many different types and some indicator stalks may perform other functions too.
In some cases there may be more than one stalk mounted on the steering column. Some designs have all the stalks pushed together as a column unit. To change one stalk you have to renew the lot. Other types have individual stalks and you only need to replace the faulty one.
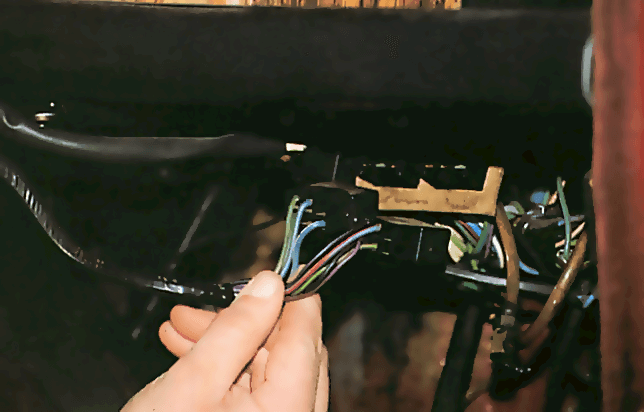
Check to see how the wiring from the stalk is connected to the main loom. In most cases it will run down the steering column and connect to the main loom via a multi-connector plug.
Disconnect the plug and release any cable ties holding the wiring to the steering column.
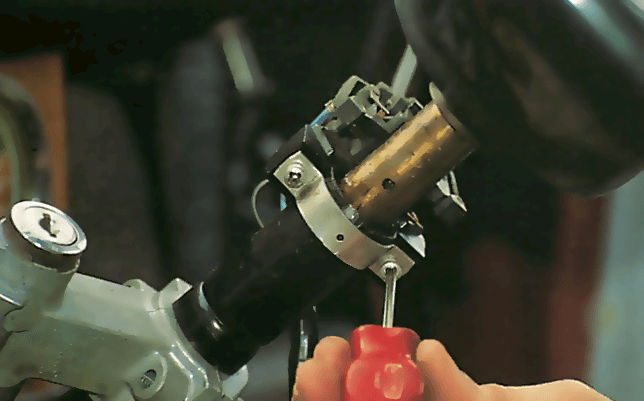
Examine how the indicator stalk is connected to the steering column. The simplest design has the base of the stalk held with screws to a bracket on the steering column.
Another type has a metal U-bracket that fits around the column and is attached to the stalk base. Undo the screws and remove the U-bracket, then pull off the stalk.
Where the stalks all come off as a cluster, the job is rather more difficult. Because the assembly fits over the steering column, you have to remove the steering wheel first. Once the wheel is off, release the screws that hold the stalk and lift it off the column. It may be quite a tight fit as in some designs the stalk assembly also forms the steering column inner shaft bearing .
Some other types, however, require the removal of the steering lock assembly before they can be removed.
Stalk inspection
Once the stalk has been removed from the car it is much easier to inspect it. Carry out any soldering or replace any broken wires that you find to be necessary.
Inspect the electrical contacts of the switch. On older stalk assemblies it is usually possible to clean up the contacts of the assembly with fine grade wet-or-dry paper or a small nail file. Operate the switch and take a closer look at the contacts to see how they work. You may find that they don't touch properly - if this is the case, bend the switch contacts so they make a better connection.
New switches usually have the contacts sealed in so you can't do any repair work.
Cancelling peg
A common problem with indicators is that of failing to cancel automatically. This is usually caused by wear in the cancelling peg attached to the inner moving column shaft. Not all cars use this system, so check.
If the peg is a threaded metal one, you can adjust it by loosening its locknut then screwing it out a fraction at a time until the indicator switch cancels automatically when the wheel is turned.
Replacement parts
If the stalk appears beyond repair check with your local main dealer to find out whether any component parts are available.
The vast majority of switch/stalk assemblies however are only available as a complete unit and they are often quite expensive to buy new.
It is worth trying at a local breaker's yard to find a replacement switch. Take care when looking for a replacement as many different types are used even for the same model. Some stalks for example may be fitted with extra functions not applicable to your model and you may find they are not compatible. On others the type of multi-plug may have been changed. Take the old switch along to help identify the correct replacement.
Before refitting remember to lubricate the contacts of the switch with electrical cleaning fluid. Don't use oil as it may insulate the contacts in the switch and prevent a current being passed.
Refitting
Refitting the switch is basically the reverse of removal. Make sure the switch is correctly aligned. Often you will find a small lug on the inner face of the switch that fits into a corresponding hole in the steering column. Tighten the securing screws.
Once the switch has been fitted reconnect the multi-connector plug. Temporarily reconnect the battery and test the system is working correctly. Refit any ties that are used to secure the wires to the steering column.
Reposition and secure the steering column shrouds and steering wheel (if applicable).

The Ultimate Car Mechanics video course
Learn everything about modern cars from our new video series.
Learn more >-
We build a Mazda MX5 Miata from scratch
We start by tearing down and then rebuilding the whole car.
-
Every part explained
There's ridiculous detail on every part. Clearly and easily explained.
-
All modeled in 3D
We've created the most detailed 3D model ever produced so we can show you everything working.
Super detailed explanations in the video course
15 hours of pro-quality, HD content with subtitles
The
video
course
Bonus: Dismantling the engine

Engine Block

Crankshaft

Tools: Using a tap set

Using an engine stand

The Pistons
