How to replace dampers
The Video Course teaches you everything about modern cars.

Modern telescopic dampers cannot be overhauled at home. The only servicing possible is to replace rubber bushes (See Checking damper units ).
Dampers that are leaking, damaged or worn out (See Checking damper units ) should be replaced with new units.
Fitting new dampers is usually straightforward, and can be done with a few medium-sized ring spanners or ratchet sockets.
On combined coil-spring and damper units you will also need to use spring compressors ; hire from a tool hire shop if necessary.
The force in a compressed spring is considerable, and a make-shift compressor could slip, allowing the spring to expand suddenly and maybe cause damage or injury.
For cars with MacPherson-strut suspension , new damper inserts can be fitted to the strut (See Renewing MacPherson-strut inserts ).
Always replace dampers in axle sets - both rear and front - otherwise the car handling becomes unbalanced.
You can buy dampers from a car accessory shop, or order them from an authorised agent.
Always give the correct make, model, year and chassis number of the car; note that saloons and estate cars of the same model may have slightly different dampers.
Apart from the standard dampers for a particular model, dampers at different ratings are also available.
They are designed for particular characteristics, such as handling and load bearing . Ask for advice about up-rated dampers at an accessory shop specialising in suspension parts.
Look at the unit carefully to make sure that it is not damaged, and that the mountings are the right type.
Front suspension layout
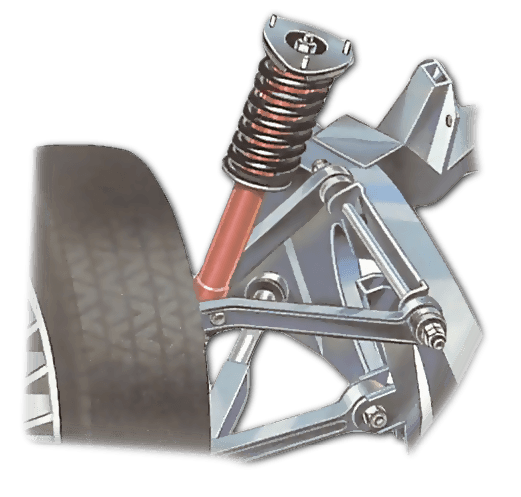
A number of modern cars have a front suspension system with an upper wishbone-shaped arm attached to the inner wing or an outrigger, and a lower wishbone arm attached to the chassis.
The dampers are usually fitted between the lower wishbone arm and the inner wing or outrigger. A few makes have the bottom damper mounting on the upper wishbone.
Where the wishbone suspension incorporates a coil spring, the damper is usually mounted within the spring, but can be removed without dismantling the spring.
On some cars, however, the coil spring and damper are combined, and the spring has to be dismantled and fitted to the new damper.
Sometimes, particularly where the coil spring bears on the upper wishbone, the spring must be compressed before the damper is removed from the car.
With either coil-spring or torsion-bar suspension, the lower wishbone must be jacked up to take the load off the damper bolts before you remove the damper from the car.
Undoing and reassembling damper mountings
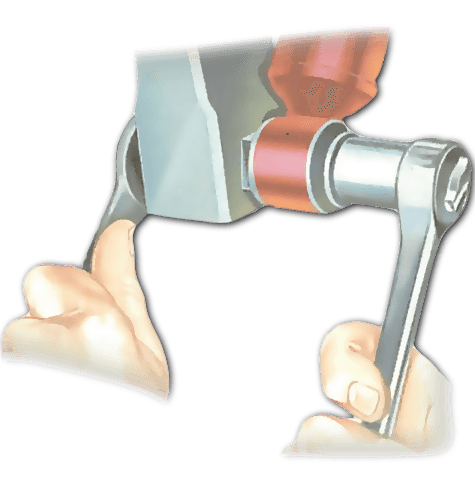
An upper pin mounting is the threaded end of the damper piston rod, and may have one or two securing nuts.
Before undoing it, note the sequence of rubbers and washers on each side of the body panel through which it is mounted.
Also measure the length of the thread protruding above the top nut. It must be the same when refitting.
When fitting new dampers for both pin and eye mountings always use the new rubbers, spacers , washers and nuts supplied; make sure they are in the right sequence noted when dismantling.
Nuts may have to be tightened to a specific torque setting with a torque wrench ; check with a dealer or in the car service manual. Where there are two nuts, the setting applies to the first, lower but; the other is a locknut.
Removing front dampers
Apply the handbrake and chock both rear wheels.
Take off the hub caps or wheel embellishers and slacken the wheel nuts. Jack up the front of the car and support it on axle stands under the chassis, so that the weight is off the suspension. Remove both front wheels.
Examine the upper and lower damper mountings to find out which type of fitting is used (See Checking damper units ). Note where any washers, rubbers and spacers are positioned.
Place a jack under the lower suspension arm; if the damper is fixed to the lower arm, make sure the jack does not block access to the bottom mounting bolt or nut.
It may be possible to position the jack under the wheel mounting flange . This will ensure free access to the damper and its mountings.
Raise the jack to lift the suspension arm; this will compress the spring and damper slightly and take the load off the damper mountings. Do not remove the jack until the new damper has been fitted.
On some coil-spring suspensions, you may need to compress the spring (See Coil springs replacement ) before undoing mountings.
If the top mounting is a threaded pin, note carefully how much of the thread sticks up above the top nut, as it must protrude by the same amount when refitted.
Measure the thread protrusion above the nut with a 6 in. (150 mm) rule.
On some cars, the upper mounting may be a bushed eye and pivot bolt, like the lower mounting.
Undo the pin mounting (See ) at the top and bottom of the damper.
If the nuts and bolts are corroded and difficult to remove, soak them for at least an hour with penetrating oil before attempting to take off the damper.
New dampers are usually supplied complete with rubber bushes, washers, spacers and nuts. Always use the new fixings, not the ones you have removed.
Reassemble the mountings in the order of removal, with correct pin measurements and torque settings for tightening nuts.
Final tightening of damper mountings is usually done with the car still raised, although it is sometimes done after the car has been lowered to the ground ; check with the car service manual or a dealer.
Removing dampers from unattached coil springs

With the car supported on axle stands and the front wheels removed, jack up the lower suspension arm to take the spring pressure off the damper mounting bolts.
Both the upper and lower damper mountings may be bushed eyes and pivots, but the lower one is likely to have its pivot held by bolts through the suspension arm.
Remove the top and bottom mounting bolts and slide the damper out through the bottom arm of the suspension.
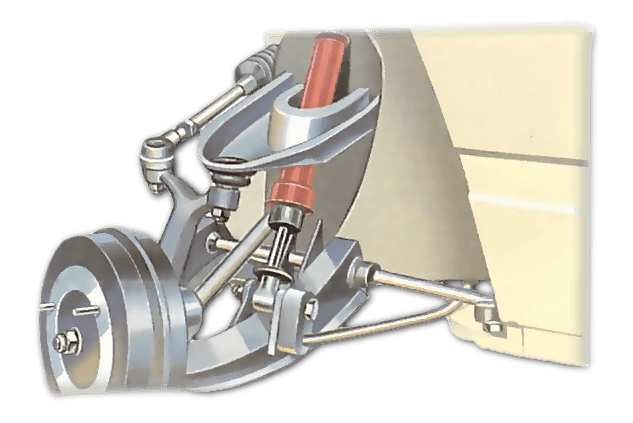
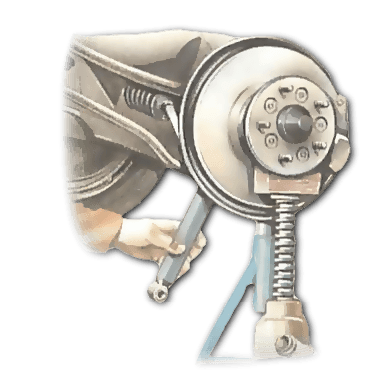
Renewing a combined coil spring and front damper
Where there is a combined coil spring and damper - as in some Triumph cars, including the Dolomite - the bottom of the damper is often located in the upper wishbone.
With the front of the car supported on axle stands, the front wheels removed, and the suspension arm jacked up, fit spring compressors to compress the coil spring (See Coil springs replacement ) so that you can remove the damper.
Undo the nuts holding the upper mounting of the damper. It is usually a spring cup held in place by the nut on the end of the piston rod.
The cup is secured to the inner wing by three or four bolts, reached from under the bonnet.
Unbolt the lower bushed-eye mounting (See ) and compress the damper by hand to lift the bottom end off the upper wishbone.
To remove the damper, pull it down to clear the upper wing.
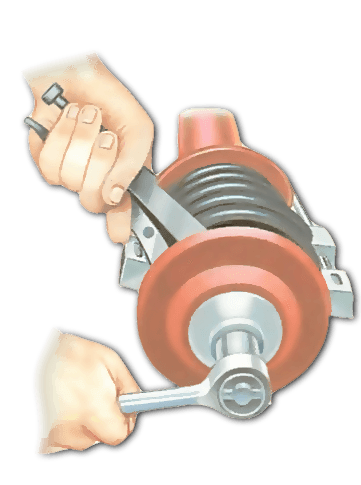
Place the compressed spring and damper in a vice; if necessary, compress the spring further so you can turn the spring cup.
Remove the nut holding the cup, and take off the rubber bush, washers, cup and spring insulating ring. Note the sequence so that parts can be refitted in the same way.
Remove the compressed spring and fit it to the new unit. Fit the spring-cup components. The lip of the spring insulating ring should be inside the coil spring.
Refit the damper to the car, and secure the mountings before removing the spring compressor.
Tighten nuts to the correct torque setting if one is specified.
Removing rear dampers
Rear dampers are usually easier to remove than front ones.
It may be necessary to remove the wheels; check in a service manual for the car.
If it is, slacken the wheel nuts before jacking up the rear of the car and supporting it on axle stands beneath chassis members. Chock the front wheels.
Note the location and type of the mountings of each of the dampers (See Checking damper units ).
To take the load off the damper mountings, jack up the rear axle or suspension arm, depending on where the damper is located.
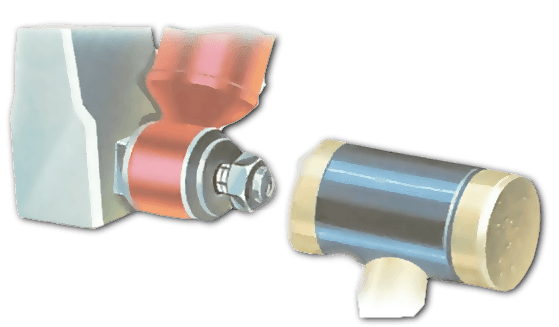
A few cars have the rear dampers mounted in the middle of coil springs located on the suspension arm. Sometimes they are a combined unit with a spring-cup mounting at the top - see illustration below right.
For coil springs you may need spring compressors specifically designed for car coil springs . Hire them if necessary.
Undo the top and bottom mountings. The top mounting is often a threaded pin (See Fitting new dampers ) through the inner wing or a bodywork turret, reached from inside the boot or the rear of the car.
You may have to remove some interior trim to get at a top mounting, and it may be covered with a rubber or plastic cap.
The lower mounting is usually a bushed eye and pivot.
To remove the damper, pull down on the damper body to compress it so that you can clear the wing. New dampers are usually supplied complete with rubber bushes, washers and nuts.
Always use the new fixings when reassembling.
Reassemble the mountings in the reverse order of removal, with the correct pin thread measurements and torque settings (See Fitting new dampers ).
Final tightening is usually done with the car still raised, although it is sometimes done with the car on the ground; check with the car service manual or a dealer.
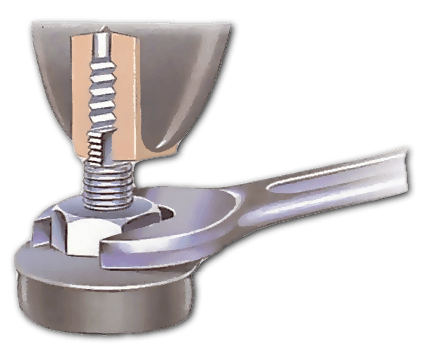
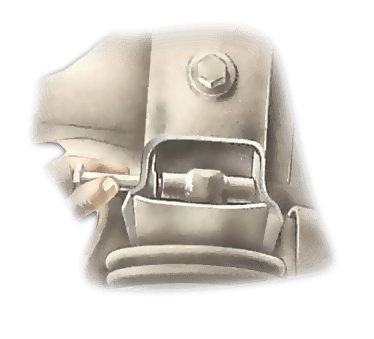
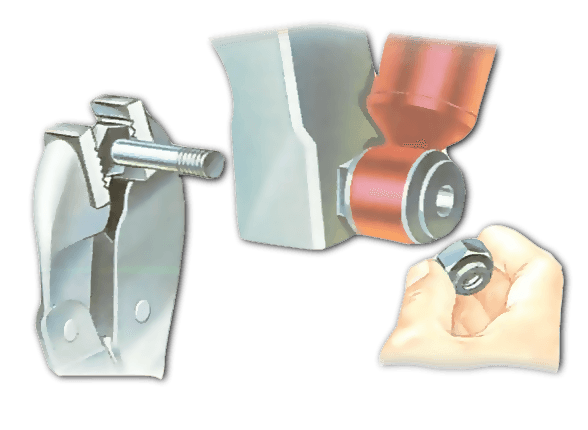
Undoing a bushed-eye mounting
The bushed eye is usually held to the damper mounting by a pivot bolt secured by a nut.
Hold the head of the bolt with a spanner or socket to prevent it turning while you use another to unscrew the nut until its outer face is flush with the end of the pivot bolt. If the nut is very stiff, apply a few drops of penetrating oil and allow it time to act.
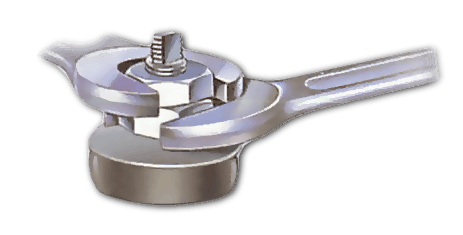
Tap the nut - not the unprotected thread - with a nylon hammer to push the bolt head free at the other end. Remove the nut and grip the bolt with grips to pull it out. Note the position of any washers.
If the bolt is seized in the mounting, drive it out using a drift of soft metal, such as a piece of brass or copper rod.
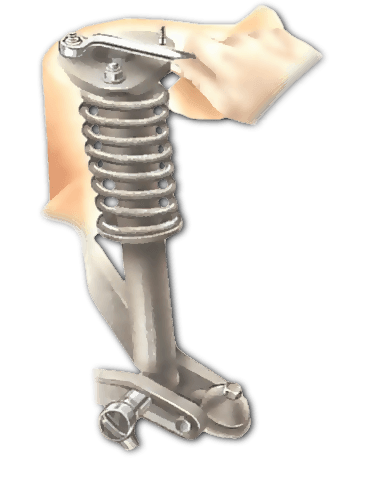
Renewing a combined coil spring and rear damper
Cars with rear dampers in a combined unit with coil springs include the VW Golf and Jetta and the Triumph Dolomite. The methods of securing the upper spring-cup mounting vary.
With the rear of the car supported on axle stands, the front wheels chocked, the rear wheels removed and the suspension arm jacked up, fit the spring compressors.
Undo the spring-cup upper mounting. It may be secured by four nuts holding it to the floor pan , or by one nut only.
Undo the bushed-eye lower mounting from the suspension arm and withdraw the damper.
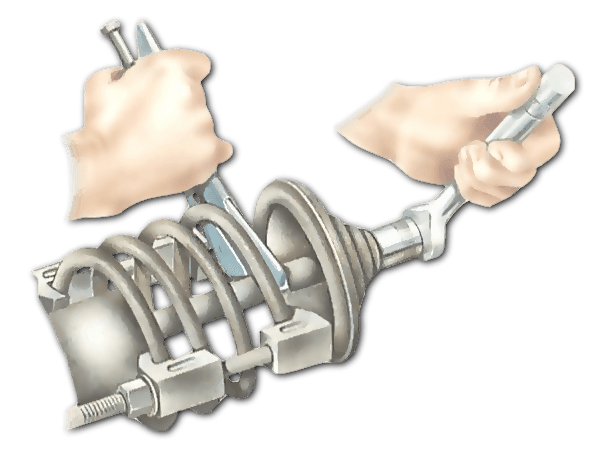
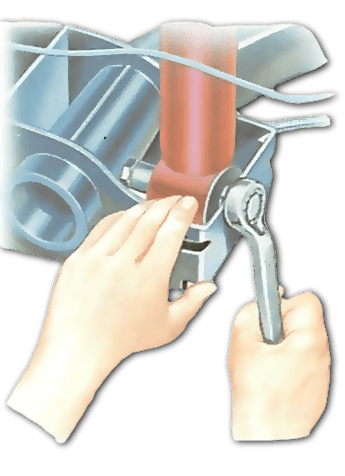
Fit the compressed spring and damper in a vice; if necessary compress the spring further so you can turn the spring cup.
Unscrew the piston-rod locknut. You may need to hold the piston rod with a pair of grips while unscrewing.
Remove the spring cup, rubbers, washers, spacers and spring insulating ring, noting the sequence to aid refitting. Remove the compressed spring and fit it to the new damper.
Reassemble the spring cup, then fit the new damper to the car and secure the mountings before you remove the spring compressors.

The Ultimate Car Mechanics video course
Learn everything about modern cars from our new video series.
Learn more >-
We build a Mazda MX5 Miata from scratch
We start by tearing down and then rebuilding the whole car.
-
Every part explained
There's ridiculous detail on every part. Clearly and easily explained.
-
All modeled in 3D
We've created the most detailed 3D model ever produced so we can show you everything working.
Super detailed explanations in the video course
15 hours of pro-quality, HD content with subtitles
The
video
course
Bonus: Dismantling the engine

Engine Block

Crankshaft

Tools: Using a tap set

Using an engine stand

The Pistons
